Showing posts with label Make-Up. Show all posts

Thursday, 28 April 2016

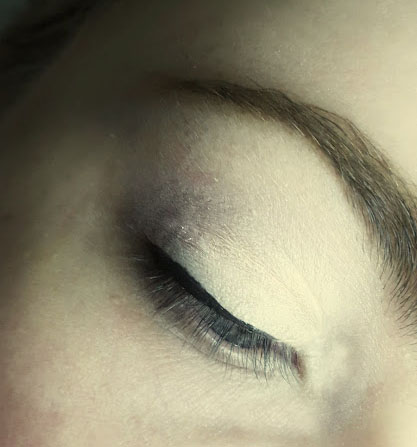
My Go-to Spring Eyeshadow Look


For me, doing my eyes is my most favoured part of doing my make-up. I really love how you can be as creative as you feel like. Whether you put in as little effort as you can or the most, you can still end up with a pretty good outcome. I always love trying out all different eye shadow combinations. One of my go-to looks at the moment is this (what I like to call..) brown smokey eye, mostly wearable for spring. Even though I have used a lot of deeper shades to achieve this, it also has a lot of highlight in the inner corner giving it a much more fresher asthet. It also uses a lot of the naked 3 pallet which is something which I need to use more of, and for the Spring/Summer time, it has the ideal shades
I started off by priming my eyes with a cream-based primer from a New York Color palette and put Bootycall from naked 2 (all the rest of the colours are naked 3) all over the lid and on the brow bone.

Using a flat eyeshadow brush I packed on nooner onto the middle of the lid and blended it out to towards the outer edge. I avoided going near the corner of my eye as I wanted this to stay highlighted.

I then used burnout in the in the crease, using a fluffy angled brush. This created a smoother transition between the colours on the lid and the highlight colour I used on my brow bone.

I went in with darkside, starting on the outer edge of the crease, blending that out through towards the middle half of the crease.

I used blackheart on a small bullet brush to create more definition in the crease. I used the same colour under my lash line to balance it out.

For my eyeliner I used L’Oreal Super Liner and attempted the thinnest line I could possibly manage. I I set this with a black eye shadow. I kept the end of the liner really blunt, I haven’t really been a fan of winged eyeliner recently.

I applied a light layer of mascara on my top lashes and then a much heavier layer on the bottom lashes and applied the Eyelure Volume lashes (no.100).

 So that’s my go-to look at the moment. What have you been wearing lately?


Tuesday, 12 April 2016

My Favourite 5 Benefit Products

I am currently suffering from a skin infection on my face, since the only of symptom of it, is extremely flaky skin,it flares up  a lot when I apply any make-up. Today, I was meant to be posting a make-up tutorial on some sort-of smoky eye-look but as you can imagine I have been feeling a little less than motivated to wear a full face of make-up . Especially as it would involve a lot of close ups and my Photoshop skills are not that great that I can erase all my problems away. So I guess that will have to wait until my face figures itself out.

Moving on, I thought instead of moping around  I would focus on the positives. Having a look at my make-up products, it has to be said that I have a fair range of Benefit products (which for some reason are missing the lids?!). I have always loved Benefit on a whole but I definitely have my favourites. 

Brow Zings
It is very rare that I find brow product that I actually like, let a lone love. A lot of the time I end up buying whatever new latest brow kit or pencil is new out on the drugstore brands, in hope that it will be actually the right shade and results.  I normally just end up tolerating whatever item I have brought to justify the small cost and so it doesn't feel like a waste of money This brow kit from Benefit was given to me by my mum, who said it was too light for her. I, on the other hand am absolutely loving it! It’s exactly the right shade for my brows, it is a shade or two darker but its not too overpowering to the point where it looks unnatural. I find that a lot of medium shades for eyebrows are very red, which looks completely terrible for me on my dark blonde eyebrows. 
They’re Real Mascara.

Hands down this is my favourite mascara. Out of the millions of many different mascaras I have tried this is the one I always come back to. I have raved about this one before if you want to hear more about it you can read about it here. But I will just quickly say that it has an amazing job for coverage for my lashes, top lash and bottom.
Hoola Bronzer
This might possibly be the product which changed my contour game from 1 to a 3 (out  of 5, I'm still not there with the whole contour situation yet, completely). However I do feel I have seen a difference in comparison to other bronzers, I have used. It doesn't contain any shimmer so it’s really good for creating a shadow for the hollows of your cheeks. The product is easily build-able so you can go as light or heavy as you need. I really do love this!

Girl Meets Pearl
I honestly didn’t think I would enjoy this when I first got it! There was something I found about cream highlight which seemed so off-putting. However the product is extremely pigmented and comes out a pearly pink colour (as you would assume). It blends out to be a more-golden toned highlighter over the top of your foundation, resulting in a really dewy and illuminating finish. This swatch is really making me want to buy the full-size version!
POREfessional
I have never really used primers or balms before applying make-up. Although as I am getting older my skin is starting to collect more and more blemishes and my pores are starting become more visible. This can be quite hard to hide with just a layer or foundation and has felt like it needed a thicker and more protective layer. POREfessional was the first primer I tried out and since then have not been able to find something which matches this. It really does smooth over the skin including dry patches and creates a mattifying base for foundation. I feel I am able to get away with using less foundation but always can gain a longer time wear out of it.

So those are some of my favourites from Benefit! What are some of yours? I am yet to try out any of their eye shadows, so maybe I should make that my next purchase! Let me know what your thoughts are!

Thursday, 10 March 2016

All I've Learnt on Winged-Eyeliner


Winged-eyeliner is very much un-doubtfully one of my favourite eye-looks to go for when doing my full face of make-up. Whether it be a dramatic or a timeless classic wing, I feel it just amplifies any make-up look from modest to fabulous.  Having said that I think we have all had a few make-up disasters and have a daunting fear when it comes to winged liquid liner. Even 6 years of practise and I still cannot get my wings the perfect shape and thickness I want (-and end up with them twice as thick than I intended them to be). However I do wear winged-eyeliner on a regular basis and have luckily found a couple of tricks and tips that have really helped me. So I thought I would make a small tutorial on how I do my eyeliner and include all the best things I’ve learnt on perfecting (well ,nearly) winged-eyeliner.
There are lots of different types of eyeliner styles. What you choose is up to you. I will leave a link HERE on a small guide with the different styles.  I’m going to be showing you what eyeliner I usually wear which is just the classic kind-of wing, but hopefully  these tips should just be transferrable to other eyeliner styles.
The Brush.
One of the most  fundamental parts of doing winged-eyeliner all comes down to the right brush. For me, I find that a hard-pointed, felt- tip like brushes are the best for easy precision. My favourites I have used in the past are; Soap and Glory Supercat Eyeliner and Loreal Super Liner – So Couture.  I’m currently using the Loreal Super Liner, Ultra Precision in this tutorial, I do really like this one however the brush bends a little too easily which can make it a bit harder if you don’t really have a lot confidence with eyeliner.  Another one which I used for years was the collection 2000 which is a really good one for plenty of practising.


                                                                                        The Line.

So I preferably like to start with the line and this gives me a better guide to where I want my wing to go. I press the side of the eyeliner brush, flat,on to the above of my lash line. I feel like this creates a rough guideline and from this I can then fill it in and make it bolder if I feel the need. Making sure, that it starts from just after where my lashes start to the end of my eyelid. I try not to go too far towards the inner part of my eye, as I feel that this can make my eyes appear a little sunken (but that’s just my opinion). The main thing I try to bear in mind when drawing the line is to keep it as close to the lash line as possible. This also helps me to avoid drawing a thicker line and also makes the lashes look fuller. I sometimes used to find that when starting out with eyeliner, that it can be easier to apply after adding a little bit of mascara, since this takes the pressure off the line being so perfect and often seems to result it, turning out better.

The Wing
Now the wing is the part which always gets me.  I always seem to do one perfect wing and then the other is just completely the opposite in every single way. It’s very rare that I can get the right with the first time. I think that a lot of this is from rushing. So taking your time is key here.
I start off by following the end of the bottom lash line and just drawing a line up to where my crease ends. I then join the end of the line to the lash line and then fill that in, overlapping the two lines. You want to make sure that the end of the wing comes to a sharp point.I find that setting my eyeliner with matte black eye shadow really helps to set it and prolong it from drying up and rubbing off. If you struggle to get a straight line and sharp edge then I find tape at the end of your eye really helps as stencil.


If any mistakes are made keep calm and use a wet cotton bud to get rid of it and dry it before continuing. I haven’t failed to point how tricky winged eyeliner really is in this post. Nor am I saying that I am completely perfect at it. It comes with a good few practises to get it how you want it, but don’t let mistakes put you off, we’ve all been there! There are millions are youtube tutorials and blog posts on winged eyeliner that will probably explain it and show it much better than I have, but this is just  my little take on winged liquid eyeliner. So, good luck!


Whats your favourite way to do your winged eyeliner?

Tuesday, 23 February 2016

Top 5: Make-up Products I will always reach for.

Follow my blog with Bloglovin
For my first blog post I thought I would start with something simple, just to get the ball rolling. So typically, when I think of blog posts and beauty related topics the one type of theme that comes to my mind are top 5's.
  During my very 'make-up' life I have come across several products which I have always found myself wanting to repurchase and use certain products on a daily basis. I do love trying new products and experimenting with different items but I always seem to find myself having a sense of comfort by some of the same products. There's just something about that reassurance of having that hassle-free product to fall back on. After de-cluttering my make-up over and over, there are some items that will always return to my daily routine. So with that said, in no particular order here are my top 5 Make up Items I will always reach for.

Number 5: Rimmel London Kate Moss Lipstick Range
It is safe to say that I have never ever collected anything as consistently as I seem to collect these lipsticks! The one product that I always seem to find my buying are the Kate Moss Lipsticks from Rimmel London. I can never help myself picking up another shade from their range whenever I pop into boots. I have to be very careful that I don’t end up buying the same shade twice because I now have so many. I think I can definitely justify this when pointing out that these seem to be the only lipsticks that I can safely say that I love, (which is good job since I have accumulated so many). I cannot credit this range enough for the amount of shades that they have and now that they've come out with their nudes range I now seem to be their biggest fan, (that’s not even a joke).They wear really well too and do not seem too drying on the lips, which I seem to find with most drugstore lipsticks.
Shade number 16: This just primarily a very pink, pink (if that makes any sense). It’s extremely aluminous and I cannot wait to wear this in the Summer with a tan.
Shade number 03: This is just a very simple beige nude which I always reach for when going to work. It’s very easy to wear on the lips. It’s kind of very close to my natural lip colour anyway, but just gives my lips an extra something.


Number 4: Elf Blush Pallette.
I am not usually a buyer for face palettes as I prefer to buy things like blush individually. However whilst wanting to expand my blush collection last year I knew that this is exactly what I needed when I saw it in the ELF sale. The palette contains 4 very diverse pinkish shades which actually includes a very nice deep pink which I'm sure could be pulled off for contouring with the right skin tones. They also one of the most pigmented items I have ever owned, so the vibrant colours are not disappointing when applied. It also comes very handy when I am travelling backwards and forwards to my boyfriend’s house due to the colour range and the massive mirror it has in the packaging. The blushes themselves are also removable from the palette so you can replace and add your own, however I have never felt the need to do so.


Number 3: Benefit, they’re real.
I do not know what I would do without this mascara. I feel like I can get effortless lashes with this mascara in seconds. When I first used this mascara, I completely fell in love. It is a total hassel-free mascara for me with no clumps or the need to feel like I have to curl my lashes. The comb-like brush really separates my lashes from the root to the tip, giving the illusion that I have  beautiful long and thick lashes. My favourite thing about this mascara is how much it coats my bottom lash line. I use the brissles at the end of the brush on my bottom lashes giving it them a few layers and boom! I have found no other mascra which comes close to this one.


 Number 2: Collection 2000 Lasting Perfection.
I was actually very late on jumping on the hype of this and actually did not seem to rate it when I first tried it (I think because I had the wrong shade). However with it’s amazing coverage and lasting finish my mind was quickly changed. Since starting work I have quickly developed into finding make-up routines which I can do in a rush. The simpler the better. This normally means skipping a few steps from my full make-up routine. I use this concealer pretty much as a foundation for work because its much quicker to apply. As it’s only work I’m not too bothered on my skin looking perfect. I have okay skin but I do need a little some to cover up redness. This blends really easily and so, in seconds I have almost clear-looking skin.So this with a light dusting of powder is the perfect coverage for my skin for work.


Number 1: Collection 2000 Cover up stick.

For as long as I can remember applying make-up daily . I have always used the Collection 2000 cover up stick. There is something about this that after I apply it to my under eye area that it makes my complexion look 10 million times more lively.  This concealer is not only for brightening my super dark circles I have also recently discovered that it doubles up as a very matt highlighter. I have gone through so many of these that it's safe to say that this is my most used make-up item. I have always worn this and will probably continue to do so for a very long time.


So that's my Top 5 products I will always reach for.
What are some of yours?